Day 1
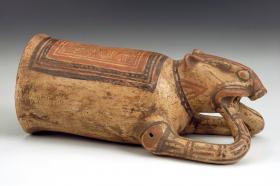
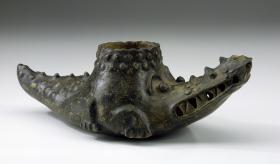
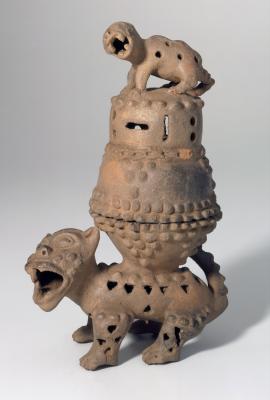
1. Break the class into small discussion groups. Assign each group an image of one of the three ceramic works of art. Ask the students to discuss the work as a group and make a list of the physical characteristics of the work of art (or what they see).
2. After students have a list of observable characteristics, ask the students to work as a group to write a paragraph or create a graphic organizer that describes the physical properties of clay based on their ceramic object and list of observations.
3. Have the groups present their analysis to the class.
4. During the presentations, create a class chart that lists clay's physical properties, noting areas of variability such as color and texture.
5. Lead a discussion about natural resources. Ask students to make predictions about what natural resources were available during this time in Costa Rica and how they could be used. Questions include: What natural resources do you think were available to people living in Costa Rica at this time? (gold, clay, wood) How can artists use these materials to create works of art? Where would artists have gotten these materials during this time in Costa Rica?
6. For homework: Have students research natural resources in Costa Rica to confirm their predictions. Ask students use the Costa Rica Natural Resources Research Handout to guide their research. Students should also bring in a small (quart-size bag) sample of soil from around their home.
Day 2
7. Discuss the research students completed about Costa Rica's resources. Share the background information about each piece of ceramic art. Discuss natural resources and how they are used for art materials. Questions include: What natural resources were available to people living in Costa Rica at this time? (gold, clay, wood) How can artists use these materials to create works of art? Where would artists have gotten these materials during this time? Why would these materials be good mediums to use to create art? What drawbacks might these materials have?
8. Discuss soil texture with the class by showing the Soil PowerPoint.
9. Have students complete the "What's Your Soil Texture?" lab using soil samples that the students supply from around their homes. Review soil texture by doing a Texture-by-Feel analysis and by using the Soil Triangle. To use the Soil Triangle, students will create a "soil shake." Allow these to settle overnight.
Day 3
10. Compare the results of the soil texture lab. Students will measure each layer of their "soil shake" and create a ratio of each layer of the soil's texture compared to the entire sample. Students will then convert these into percentages and use the Soil Triangle to determine their soil's texture. Students will complete the "What's Your Soil Texture?" analysis and conclusion questions.
11. After students have determined the texture of each sample, label and group the local soil samples as clay, sand, and silt. Allow students to make observations of each group (sand, silt, clay) and compare and contrast the soil samples by using the Soil Texture Graphic Organizer. Students should observe physical characteristics, texture, color, and consistency. Students should use the sense of touch to observe as well as observe the soil using a hand lens.
12. As a class, discuss the properties of materials that may be appealing to an artist (malleability, color, availability). Ask students to use their comparisons of the sand, silt, and clay to evaluate each type of soil to be used for art making. Have students write a short paragraph describing which soil texture they believe would be the best to use for creating ceramic art. Students should use their analysis of the soil (from their graphic organizer) to defend their reasoning.
13. Have students compare the physical characteristics of the local samples of soil with clay purchased from an art-supply store. As a class, discuss the reasons the store-bought clay has been manufactured to accentuate particular physical properties.
Day 4
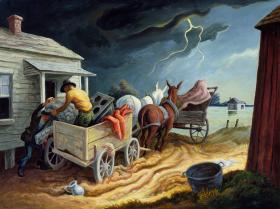
14. Project and discuss Spring on the Missouri by Thomas Hart Benton. Questions may include: What do you see in this picture? What do you think is going on? What do you see that makes you say that? What natural force is shown in this picture? How do natural forces affect the environment, humans, and other creatures? How are the people reacting to this natural phenomenon? How does the artist use texture in this painting?
15. Discuss background, middle ground, and foreground of paintings. Have students pick out the background, middle ground, and foreground on Spring on the Missouri. Ask students: How does the artist distinguish between each one? What effect does this have on the painting?
16. Using a large (11x14) piece of poster board, have students sketch a dramatic nature scene. Tell students to be sure that their drawing shows the difference between the background, middle ground, and foreground.
17. Tell students that they are going to be using materials from the earth to create a painting. Students should use the local soil samples to create a paint by mixing the soil with glue and water. (Students can create the consistency they want by using more or less water/glue mixture).
18. Students should use the paint to paint their dramatic nature scenes, taking careful consideration into painting the background, middle ground, and foreground.
19. Once students' paintings are dry, ask students to complete the reflection handout and share reflections with the class.
- Group list, paragraph/graphic organizer, and class discussion may be used to assess students' understanding of clay's physical properties.
- Students' homework assignment and discussion about Costa Rica's natural resources demonstrate the students' understanding of the relationship between art materials and natural resources.
- "What's Your Soil Texture?" lab is used to assess students' knowledge of soil textures. (Soil Texture Rubric)
- The Soil Graphic Organizer assesses students on comparing and contrasting the texture of soil. (Soil Texture Rubric)
- The analysis of soil composition and manufactured clay may be used to assess whether students are able to apply knowledge of clay's properties. (Soil Texture Rubric)
- Students’ painting and reflection will show use of background, middle ground, and foreground and the process of creating the painting. Students’ understanding of texture in art and soil will also be assessed through the reflection. (Soil Texture Rubric)
natural resource
effigy
peccary
shamans
incense
texture
malleability
sand
silt
clay
soil triangle
texture-by-feel analysis
background
middle ground
foreground
- Soil from students' homes or various locations around town
- Clear bottles with lids (water bottles, small soda bottles, etc.)
- Rulers
- Calculators
- Copies of Texture-by-Feel Guide (attached to lab)
- Copies of Soil Triangle (attached to lab—if laminated, they can be reused with a Vis-a-Vis marker)
- Hand lens
- Samples of manufactured clay
- Large pieces of poster board
- Paint brushes
- Glue
- Water
- Containers to mix paint (muffin tins, butter containers, etc.)
Pre-Columbian Costa Rican and Nicaraguan ceramic artists excelled in combining traditional jar forms with those of animals. This small cylindrical jar is supported by three appendages modeled to represent a peccary, or wild pig, common to the Central American lowlands. Note the peccary's characteristically long and slightly curled nose. The artist cleverly fashioned his arms to form two supports, so that he seems to balance upside-down like an acrobat.
Ancient Americans often buried ceramic pots and other works of art with people when they died. Even buried in damp ground for a thousand years, ceramic art can survive and keep its painted decoration. Sometimes archaeologists find ceramic works broken into pieces. This crocodile-shaped pot came to the Museum in many pieces and was glued back together. This work is called an effigy, which means it looks like a figure or animal, in this case probably the American crocodile. Crocodiles are the most powerful animals in the water and were considered godlike spirits in ancient America. They are sometimes mistakenly called alligators, but alligators live only in the United States and China.
The tall incense burner is supported by a large snarling jaguar, which is replicated in a smaller version atop the lid. Burning coals and incense were placed in the bowl on the back of the large jaguar, and the smoke escaped through small holes in the lid. The alligator and the jaguar are the two most powerful animals of the aquatic and terrestrial realms in Costa Rica. Because they hunt at night and can see in the dark, they gained even greater power in the minds of humans. These animals were traditionally associated with the power of shamans, religious practitioners who were thought to share the animals' supernatural prowess.
In February 1937 Thomas Hart Benton was sent by the Kansas City Star to sketch the flood-devastated region of southeastern Missouri. The artist reported that "the roads of the flood country were full of movers . . . Every once in a while seepage from under the levee would force evacuation of a house and you would see a great struggle to get animals and goods out of the rising water."
Benton's quick, vivid sketches later led to Spring on the Missouri. However, in translating the drawings into a painting, the artist reimagined the scene as symbolic of mankind's valiant and unrelenting struggle with the forces of nature.


