1. Students will investigate water movement.
2. Students will identify how movement can be shown in art.
3. Students will identify the difference between dark and light colors (or value).
4. Students will explore how to blend paint to create light and dark colors.
Cognitive Development: CD-5
Cognitive Development: CD-14, CD-15
Preparation
- Cover tables with butcher paper or newspaper.
- Pour small amounts (half dollar size) of blue, green, and purple tempera paints on paper plates (one plate per 2 children).
- Pour small amounts of white and black tempera paints on a separate paper plate, set aside.
Set-Up
- Set one paper plate with paint between two students at each table.
- Set one sheet of paper at each place.
Introduction/ Warm-Up
1. The teacher holds a water bottle filled half full with water and some blue food coloring. The teacher makes gentle movements to make the water slosh around. Observe and discuss the movement it makes. Next, s/he makes the water still, and then moves it to make the “waves” even bigger and stormier. Discuss what the water looks like at each step. Discuss the words wave, ripple, still. Show examples of these characteristics using the water in the bottle.
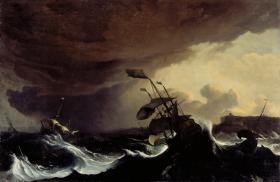
2. Look at Ships in a Stormy Sea off a Coast. Ask students if they would like to be in one of the ships in the painting. Why or why not? How might the water feel? How would the wind feel? How hard is it blowing? Would it be cold or warm? Why? Is the water still, rippling, or wavy?
3. Pretend that they are sitting in a boat and the wind starts to blow hard. Have them rock back and forth. (Optional: Play stormy sounds in the background.)
4. Ask students to describe colors they see in the painting. How do these colors make them feel?
5. Ask students to identify light colors and dark colors in painting.
6. Explain to students that they are going to make stormy paintings using their fingers! To do this, they will use dark colors like the ones they see in this painting. Tell students that they will need to be extra careful during the lesson so that their paint stays on their paper and so their stormy fingers do not rip the paper.
Focus Activity Procedure
1. In preparation for fingerpainting, ask students to hold up their fingers and make the “stormy” gestures that they might make when applying paint to their paper. What type of gestures might the students make if they were painting a calm, sunny day?
2. Briefly demonstrate to class how to begin applying and layering paint to create a storm. Ask students where the water should go. Ask students where the sky and clouds should be. What kinds of clouds would fill the sky on a stormy day? How would the waves curl? How tall will they be? Tell students that they should cover the bottom area of their paper with stormy waves and the top area of their paper with stormy clouds. (Touch the paper as you say this.)
3. Tell students that after they make stormy waves and stormy clouds they will make some areas dark and some areas light. Demonstrate how to do this by adding some black and white to different sections of the demonstration painting. Tell students that they should choose one area to make really dark and one area to make really light.
4. Excuse students to tables to begin working. Play stormy music of your choice. Remind students that they will first cover the bottom area of their paper with stormy waves and the top area of their paper with stormy clouds.
5. Once students have covered a large portion of their papers, stop the class to remind them how to create light and dark colors with the black and white paint.
6. Distribute black and white paint at each table.
7. Monitor the class as they work to ensure that paintings don’t all turn grey (or black!).
8. Once paintings are complete, clean up and transition to closing.
Closing
1. Clean up.
2. Gather class together for closing conversation. Ask students if they think their paintings look stormy. Ask students to share how they were able to combine colors to make dark and stormy waves and clouds. What motions did they use with their fingers to paint the waves and clouds? Ask them to show this motion in the air. Last, ask the class for a show of hands to find out who likes stormy weather.
3. Do a gallery walk to see everyone’s stormy paintings
4. Ask students to look for art all around them at home and at school!
1. Assess students’ understanding of how water might move and how they should move by playing Simon Says. For example, call out, “Simon Says, move like waves in a storm!” “Simon Says, move like waves on calm day.”
2. While students are working, circulate to assess if they are creating dark and light values in their artwork. Ask questions about the colors they are creating. Ask which are the light colors and which are the dark colors.
movement
blend
- Stormy music or wind/weather/ocean sounds to play while they paint. Suggested music (see list below for ideas)
- 11”x14” (max size) watercolor paper, fingerpaint paper, or tin foil
- fingerpaint paint made by adding liquid tempera paint to cornstarch mixture or commercial fingerpaint: black, white, blue, green, purple,
- styrofoam plates (for paint set up)
Possible Music Choices (all found on YouTube)
- Richard Wagner - Ride of the Valkyries
- Vivaldi - Summer, from “The Four Seasons”
- Rossini - Storm scene from “Barber of Seville”
Extension Activities for Teachers
- Use Simon Says to assess students’ understanding of water movement. Ex. Simon Say, move like a stormy sea. Simon Says, move like a calm ocean.
- Listen to stormy music while painting, brainstorm feeling words associated with stormy weather, move around like ships in different types of weather. Create a stormy dance. What movements would you make?
Extension Activities for Families
- What makes a storm? What does your family do when you are together and it is stormy?
Suggested Books for Classroom Library
Cole, Henry. On the Way to the Beach. HarperCollins/Greenwillow, 2003. [ISBN 978-0-688-
17515-3]
Lee, Suzy. Wave. Chronicle Books, 2008. [ISBN 978-0-8118-5924-0]
Lionni, Leo. On My Beach There Are Many Pebbles. HarperCollins/Mulberry, 1994, 1961.
[ISBN 978-0-7587-9901-2]


Ships in a Stormy Sea Off a Coast provides a powerful and chilling reminder of how vulnerable ships are to nature's fury. Seastorm paintings, known as stormpjes, were popular with the Dutch public of the seventeenth century. The Dutch, who were dependent on overseas trade and who waged a constant battle against the sea along their coast, left vivid descriptions of many such violent storms in their historical records. Some scholars have suggested that this painting portrays an actual event, the loss of the Dutch men-of-war Ridderschap and Hollandia in a hurricane in the Strait of Gibraltar, 1-3 March 1694. Whether a real or imagined storm at sea, this arresting image fills a major gap in the Museum's outstanding collection of northern European paintings.