- Students will be able to define mosaic as artwork made up of small shapes that create a pattern or patterns.
- Students will be able to identify triangles, squares, and rectangles.
- Students will be able to identify patterns.
- Students will be able to understand and use the term complimentary colors.
- Students will be able to compare and contrast mosaics using the names of shapes, articulating the patterns present, and discussing complimentary colors within the mosaics.
K.V.1.4, K.V.1.5, K.CX. 2.2, K.CR.1
1.V.1.4, 1.V.1.5, 1.CX. 2.2, 1.CR.1.2
2.V.1.4, 2.V.1.5, 2.CX.2.2, 2.CR.1
CCSS.Math.Content.K.G.A.2, CCSS.Math.Content.K.G.B.4, CCSS.Math.Content.K.G.B.6
CCSS.Math.Content.1.G.A.1
CCSS.Math.Content.2.G.A.1
- Show students basic shapes (triangle, square, rectangle). First and second graders should be able to add hexagon and trapezoid. Ask students to identify each shape.
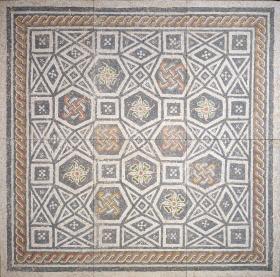
- Tell students they will see a mosaic today. Define mosaic as artwork that contains small, mostly square pieces of stone or glass of different colors that create a picture or a pattern. Show students the mosaic. Observe quietly for two or three minutes. What do you see? Which shapes are present in the mosaic? Ask a volunteer to point out the triangles. Notice that not all of the triangles are the same. Ask students to compare the triangles. Point out the diamonds and squares. Notice how they both have four sides and four angles but form different shapes. Ask a student volunteer to find the hexagons. Remind students that mosaics are works of art composed of small squares that create either a picture (like a person) or a pattern. Is this mosaic a picture mosaic (representational mosaic) or a pattern mosaic? Show students the Mosaic Floor Panel to explain how a mosaic can create an image/picture. Show students the original NCMA’s Roman mosaic again. What patterns are present? What colors did the artist use? How are smaller shapes used to create larger shapes? What shape does the whole mosaic make? Tell students this mosaic was used in a Roman home over 1,000 years ago. The mosaic was partially exposed to the outside. The stone and tiles would have been especially beautiful and sparkly when rainwater flowed over them.
- Tell students that today they are going to imagine they are artists who have been commissioned to create square mosaics. The mosaics must have at least one pattern present and must cover the majority of the 8 x 8 in. piece of paper you hand out. They can use any shapes and colors they would like from the pattern block bins. Show students that even with tiny mosaic squares, artists cannot always fill the space completely or evenly. A good example of this is in the hexagons of the mosaic. Tell them that their mosaics may not necessarily be perfectly square and the shapes may not line up perfectly. They should focus on creating a pattern using shapes.
- Ask students to help you brainstorm the decisions an artist might have to make before starting a mosaic. Some decisions include the number of colors the artist chooses to use, what colors the artist uses (calming, cool colors? Exciting, bright colors?), and the pattern or patterns the artist chooses to create. Point out the colors in the Roman mosaic. What colors are used in most of the mosaic? Tell students the artist chose to use blues, grays, and greens with just a little bit of orange. Show students how blue and green are together on the color wheel and how orange is directly opposite. Define orange as a complimentary color to blue, which is directly opposite it. Encourage students to choose colors close to each other on the color wheel and a third complimentary color. Tell students they will have to make these decisions as a group. Divide students into groups of three or four. Give each group one 8 x 8 in. piece of paper and a bin of pattern blocks, and let them create their mosaics.
- As students finish, ask each group about the mosaic they have created. What shapes did they choose? Why did they choose the colors they used? What patterns are present in their mosaic? Take a picture of each mosaic.
- Using a digital projector or printing the pictures of the mosaic, show students each group’s design. Are any mosaics alike? How are they different? Ask group members to share why they chose specific colors in their patterns.
- Display printed mosaics.
Discussion will demonstrate students’ ability to define mosaic as artwork made up of small shapes that create a pattern or patterns.
Classroom discussion will demonstrate students’ ability to correctly identify shapes and patterns within the mosaic.
Collaborative work will demonstrate students’ ability to choose complimentary colors and show patterns using pattern blocks.
Classroom discussion will demonstrate students’ ability to compare and contrast the mosaics created by their peers.
Mosaic: artwork made up of small shapes that create a pattern or patterns
Representational mosaic: artwork made up of small shapes that represent an object or living thing
Pattern: repetition in color or design
Complimentary color: colors that are opposite each other on the color wheel
Color wheel
8 x 8 in. paper sheet for every group of three or four students
A bin of pattern blocks for every group of three or four students
Digital camera
Mosaic floors decorated the homes of wealthy Roman citizens. The size of this mosaic suggests it may have been in a house’s atrium (a colonnaded court, partially open to the sky) covering a cistern where rainwater was collected. As the water flowed over the mosaic, the brightly colored stone and green glass tiles of the geometric and floral patterns would have sparkled.